10 Ways to Get Rid of Piercing Bumps, According to Experts
Posted by Jessy L. on 20th Apr 2024
Posted by Jessy L. on 20th Apr 2024

Getting a new piercing is a popular way to add a touch of personality and express yourself. But let's be honest, even the most enthusiastically pierced among us know that sometimes things don't go exactly according to plan.
Despite following all the aftercare instructions, you might notice a little bump appear near your piercing. Piercing bumps are incredibly common, and in most cases, they're nothing to worry about.
The key to a healthy piercing lies in proper aftercare. Just like any wound, a new piercing needs a clean and nurturing environment to heal properly. Unfortunately, our bodies can sometimes react to the piercing itself, or external irritants, by forming these little bumps.
This guide will be your battle plan for tackling those bumps effectively. We'll explore various piercing bump care and treatment methods used by professional piercers and dermatologists. Follow these simple tips to soothe irritation and promote healing.
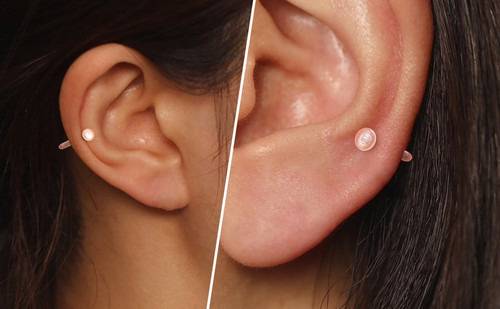
Piercing bumps are a frequent occurrence, especially for piercings in areas with thicker cartilage, like your nose or upper ear. These small lumps appear because your amazing immune system is simply doing its job.
When you get a piercing, your body creates a tiny wound. To protect itself from invaders, your immune system sends white blood cells to the area. This can cause some inflammation and lead to the formation of a bump.
They're typically red or pink and might not cause any pain at first. As they age, they may turn white and resemble scar tissue. Piercing keloids, on the other hand, start as raised red or pink bumps and can grow larger over time, potentially changing color to purple or brown
While these bumps might not be aesthetically pleasing, they're usually benign and treatable. Various types of piercing bumps exist, and it's important to know each type to ensure proper care and treatment.
These small, red bumps are the most common type of piercing bump. They form when your immune system overreacts and builds up tissue around the piercing jewelry, essentially creating a wall around what it perceives as a foreign object.
Unlike granulomas, piercing keloids are raised scars that can develop after a piercing heals. While not dangerous, they can be larger and more noticeable than granulomas.
Piercing keloids are more common in people with certain skin types, and treatment options can help reduce their size. The American Academy of Dermatology Association recommends avoiding piercings if anyone in your family has a history of keloids.
In some cases, piercing bumps might be a sign of an allergic reaction to the piercing jewelry or an infection. While less frequent than granulomas, these bumps can usually be resolved with treatment. However, depending on the severity, you might need to remove the piercing to allow proper healing.
Bumps can also form due to unintentional damage to the piercing itself. This can happen from snagging the jewelry on clothing, sleeping on an unhealed piercing, or even cleaning it too aggressively.
A saline solution is essentially a saltwater solution that mimics the body's natural fluids. This seemingly simple concoction packs a powerful punch when it comes to battling piercing bumps.
Saline soaks work wonders at reducing inflammation. When you soak your piercing in a saline solution, it helps draw out excess fluids contributing to the swelling.
Saline solution also acts as a gentle but effective cleaning agent. It helps remove any dried discharge or crusting that might be harboring bacteria. This helps keep the piercing clean and free of irritants.
This can significantly reduce the risk of infection, a major concern with any piercing bump. Infected piercings are those that appear red, swollen, and potentially accompanied by pus.
There are two convenient ways to incorporate saline soaks into your piercing care routine. The first option is the fuss-free route: grab a store-bought saline wound wash readily available at most pharmacies. These pre-mixed solutions come with the peace of mind of precise dilution and sterility, ensuring you're giving your piercing the best possible care.
If you're the DIY type, creating your saline solution at home is a breeze. All you need is non-iodized sea salt and distilled water. Remember, "iodized" can irritate a piercing, so stick to pure, non-iodized sea salt for your homemade solution.
Keeping your new piercing clean is crucial for proper healing and avoiding irritation bumps. But what you clean it with can make all the difference.
Harsh soaps, alcohol, and even hydrogen peroxide can set you back. They can dry out the piercing and irritate the delicate skin around it. There are very specific reasons for avoiding these products.
Many soaps contain ingredients that are too strong for new piercings. Fragrances, dyes, and antibacterial agents can disrupt the natural healing process and irritate the piercing site. Harsh soaps might leave piercings dry and tight.
While alcohol is a great disinfectant, it's also too harsh for piercings. Alcohol can dry out the piercing, slowing healing and making it more susceptible to irritation bumps.
Like alcohol, hydrogen peroxide is another disinfectant that can be too drying for piercings. While it might seem like a sterile option, it can damage healthy tissue and slow healing. If you put hydrogen peroxide on a minor cut - it might cause some bubbling and stinging, which isn't ideal for promoting healthy healing.
So what should you use instead? The key is to opt for gentle, unscented cleansers. Look for a fragrance-free soap specifically designed for sensitive skin. These will cleanse the piercing without disrupting the healing process or causing irritation.
When choosing a piercing cleanser, think about what you would use to wash your baby's delicate skin. Gentle and fragrance-free is the way to go.
Those sparkly new earrings or your cool nose ring might be tempting to fiddle with but fight the urge. Minimizing contact is essential, especially for a delicate piercing like one in your nose. Our hands come into contact with countless surfaces throughout the day, picking up a variety of bacteria.
When you touch your nose piercing bump, for example, you're essentially transferring those unwanted microbes to the delicate wound. This can trigger an inflammatory response in your body. This inflammation can lead to the formation of a bump right around your nose piercing.
A little patience and a hands-off approach go a long way in ensuring your piercing heals well. Admire your new bling from afar, and resist the urge to touch - your piercing will thank you for it.
As dermatologist and cosmetic surgeon Kim Nichols, MD, advises:
"Typically, new ear lobe piercings heal in about six weeks but if you keep touching it during that time, infection may occur. Twisting and turning a new piercing could damage the delicate skin and hinder the healing process. Your hands can expose your new piercing to germs and bacteria, which can lead to another infection and scarring."
So, how do you avoid these complications? The only time you should handle your piercing is during cleaning, and even then, make sure your hands are squeaky clean.
Wash them thoroughly with warm water and a gentle, fragrance-free soap. This minimizes the risk of introducing bacteria and allows your piercing to heal smoothly and bump-free.
Tea tree oil is a natural essential oil extracted from the Melaleuca alternifolia plant. It boasts some interesting properties that might be helpful for piercing bumps.
Tea tree oil is known for its anti-inflammatory properties. These properties are attributed to compounds like terpinen-4-ol, which can help reduce swelling and redness associated with a bump. It can be naturally soother for your irritated piercing, calming the inflammatory response in the tissue if you use it properly.
It also has antimicrobial properties. This means it can help fight bacteria that might be contributing to the bump. While not a complete replacement for a proper cleaning routine, it can be a helpful addition to your piercing care routine.
In its pure form, it is very potent and can irritate the delicate skin around your piercing. Always dilute it with a carrier oil like jojoba oil or coconut oil before applying it to your skin. A good rule of thumb is to mix 1-2 drops of tea tree oil with a teaspoon of carrier oil.
Not everyone reacts well to tea tree oil. Before applying it near your piercing, do a patch test. Apply a diluted solution (1-2 drops in a teaspoon of carrier oil) to a small area of your forearm and wait 24 hours. If you experience any redness, itching, or burning, discontinue use.
After cleaning your piercing with a saline solution as directed by your piercer, dip a cotton swab in the diluted tea tree oil solution. Gently dab the cotton swab around the piercing, avoiding direct contact with the piercing itself. Do this 2-3 times a day for a maximum of two weeks.
It's important to understand tea tree oil is not a cure for piercing keloids. Piercing keloids are raised scar tissues that can form around piercings due to an overproduction of collagen during the healing process.
While some anecdotal evidence suggests tea tree oil might help minimize their appearance, there's no strong scientific proof to support this claim. Tea tree oil may be effective for the prevention of piercing keloids rather than treatment.
If you suspect a keloid, consult a professional piercer or dermatologist for the best course of action. They might recommend treatment options like steroid injections or laser therapy.
Nature also offers another gentle remedy in the form of chamomile. Chamomile is a flowering plant with well-known soothing properties that can be helpful for irritated skin, including the sensitive area around your piercing.
Chamomile contains compounds like apigenin and bisabolol, known for their anti-inflammatory and calming effects. These properties can help reduce redness and swelling associated with a piercing bump.
Unlike harsh chemicals, chamomile is incredibly gentle. This makes it a safe choice for soothing the delicate skin around your piercing, minimizing the risk of further irritation.
Steep a chamomile tea bag in hot water for a few minutes. Let it cool completely until it's lukewarm (but not hot!). You can also place the tea bag in the refrigerator for a few minutes to speed up the cooling process.
Once cool, hold the damp tea bag gently against the piercing for 5-10 minutes. The chamomile infusion will bathe the area with its calming properties, reducing inflammation and discomfort. Repeat this process 2-3 times a day for a maximum of two weeks.
Remember, Just like tea tree oil, before using chamomile on your piercing, it's always a good idea to do a patch test. Use the same tea tree oil patch test procedure. If you experience any side effects, avoid use.
Sometimes right after getting new piercings, you're itching to show it off with some new jewelry. Always hold your horses, when it comes to aftercare, professional piercers have a golden rule: patience is key. Letting your piercing heal undisturbed is the best way to avoid bumps.
Healing takes time. Removing, or twisting the jewelry disrupts this process. Excessive contact irritates the tissues and delays healing, creating the perfect breeding ground for a bump.
Every time you change your jewelry, especially early on, you're essentially creating a new wound. This can introduce bacteria and irritate the piercing site, potentially leading to bumps or even infections. Follow your piercer's instructions and leave the initial jewelry in place for the recommended healing time to minimize trauma.
The constant movement of the jewelry creates friction against the healing tissue. This friction can irritate the piercing site and contribute to the formation of a bump near the piercing. Leaving the jewelry undisturbed minimizes friction and allows for smoother healing.
We know resisting the urge to put on new bling can be tough. But trust us, your future self with a bump-free piercing will thank you. L.I.T.H.A. (Leave It The Hell Alone) isn't about neglect; it's about creating the optimal environment for your piercing to heal.
Even with the best aftercare routine, sometimes a stubborn bump near your piercing, like a nose piercing bump, just won't budge. But don't despair about its healing. There's no shame in seeking professional help.
Consulting a professional piercer or dermatologist can be the best course of action for a persistent or worsening bump. A professional piercer or dermatologist has the expertise to assess your situation and the specific type of bump you're experiencing. They can determine the underlying cause and recommend the most effective treatment plan for you.
There's no one-size-fits-all solution for piercing maintenance. A professional can tailor their advice to your specific piercing, aftercare routine, and any underlying sensitivities you might have. This personalized approach increases the chances of a successful resolution.
In some cases, a bump might require additional interventions beyond home remedies, especially infected piercings. A professional piercer or dermatologist may recommend medicated solutions, or even the removal and re-piercing of the jewelry (in severe cases). They have the training and experience to determine the best course of action for your situation.
In some cases, a healthcare professional might recommend an over-the-counter antibiotic cream for a piercing bump. This is particularly true if they suspect an infected piercing.
Infections can occur when bacteria enter the piercing site and begin to multiply. Antibiotic creams work by targeting and killing these bacteria, preventing them from spreading and causing further damage.
Antibacterial creams promote healing by reducing the bacterial load and preventing infection. This can help to reduce inflammation, redness, and the formation of bumps associated with an infected piercing.
It's important to understand a healthcare professional will determine the appropriate course of treatment. In some cases, a prescription-strength antibiotic cream or oral antibiotics might be necessary. Never self-medicate with antibiotic creams - only use them as directed by a doctor or piercer.
Antibiotic creams are typically used for a short period, as directed by your healthcare provider. Overuse can lead to antibiotic resistance, making it harder to fight future infections.
Please note that antibiotic creams are not a cure-all for piercing bumps. They are most effective for treating confirmed bacterial infections. If the bump is caused by irritation or allergy, an antibiotic cream might not be helpful
If you suspect your piercing might be infected, don't hesitate to consult a healthcare professional. They can diagnose the cause of the bump, recommend the most appropriate piercing bump treatment plan, and ensure your piercing heals properly.
Here are some signs that might indicate an infected piercing:
Oral piercings, like tongue piercings or labrets, require special care due to their location in the mouth. A warm salt water gargle becomes your best friend for an oral piercing.
Warm salt water acts as a natural anti-inflammatory. Gargling with this solution can help reduce swelling and promote healing by bringing down inflammation in the tissues around the piercing.
Your mouth is teeming with bacteria. Regular gargling with saline helps remove food particles, plaque, and bacteria that can accumulate around the piercing site. This reduces the risk of infection and keeps the area clean.
Prepare a saline solution by dissolving 1/4 teaspoon of non-iodized sea salt (or table salt) in a cup of warm distilled water. Gently fill your mouth with the warm saline solution and swish thoroughly for 30-60 seconds.
Gargling helps to move the solution around the piercing site, ensuring it reaches all areas. Avoid swallowing the solution. Repeat the warm salt water gargles 2-3 times a day, especially after meals to keep the area clean.
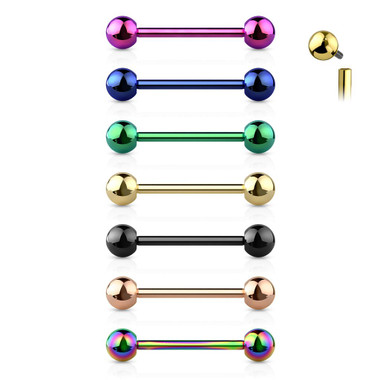
The culprit behind an infected piercing or piercing bump might be something as simple as your jewelry. Believe it or not, the type of metal and the style of the jewelry you choose can significantly impact healing and bump formation.
Not all metals are created equal when it comes to piercings. Certain materials like nickel found in cheaper jewelry can irritate the piercing site and trigger an inflammatory response, leading to the formation of a bump. Think of it like your body reacting to a foreign invader - the irritation leads to swelling and bump formation to try and wall off the irritant.
The key is to choose hypoallergenic materials that are gentle on your skin and won't trigger irritation. Look for implant-grade materials like titanium, niobium, or surgical steel. These materials are biocompatible, meaning they're less likely to cause a reaction in your body.
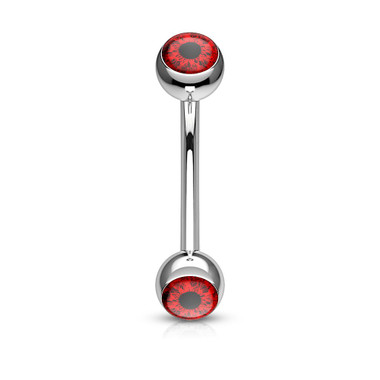
Beyond material, the style of your jewelry also plays a role. For a new piercing, especially in a sensitive area like your nose, avoid jewelry with sharp edges, dangly charms, or excessive bulk. Opt for smooth, implant-grade studs that allow for comfortable movement and undisturbed healing.
Remember, the right jewelry is an investment in your piercing health. Avoid cheap, flashy options that could irritate your piercing and lead to bumps. Talk to your piercer about the best material and style for your specific piercing and healing stage.
With the right knowledge, you can say goodbye to piercing bumps and hello to a happy, healthy piercing. Consistent cleaning, minimizing contact, and choosing the right jewelry create the perfect environment for healing and prevent unwanted bumps.
Remember, for persistent bumps, don't hesitate to consult a professional piercer or dermatologist. Follow all these tips and tricks, and you'll be well on your way to achieving the beautiful piercing you've always dreamed of.
Want to delve deeper into piercing care and the world of jewelry? Visit our website to discover the perfect jewelry to flaunt your new bling with confidence!